
TL;DR
Using a closet for audio work is about smart placement and proper dampening, not just filling it with foam. Moving equipment away from your ears and sealing gaps makes a bigger difference than you think. Ventilation is key—ignore it, and your rig overheats or sounds worse.
Imagine turning a tiny closet into your personal vocal booth—no more echo, no more noise bleed. It sounds simple, but the secret lies in understanding what really makes a space quiet and how to set it up without turning it into a tech nightmare.
This article pulls back the curtain on acoustic dampening, placement, and the famous ‘rig in the closet’ setup. You’ll learn what works, what doesn’t, and how to do it without pouring money into dead-end solutions. Ready to get your closet sounding better than your main room?
Acoustic dampening
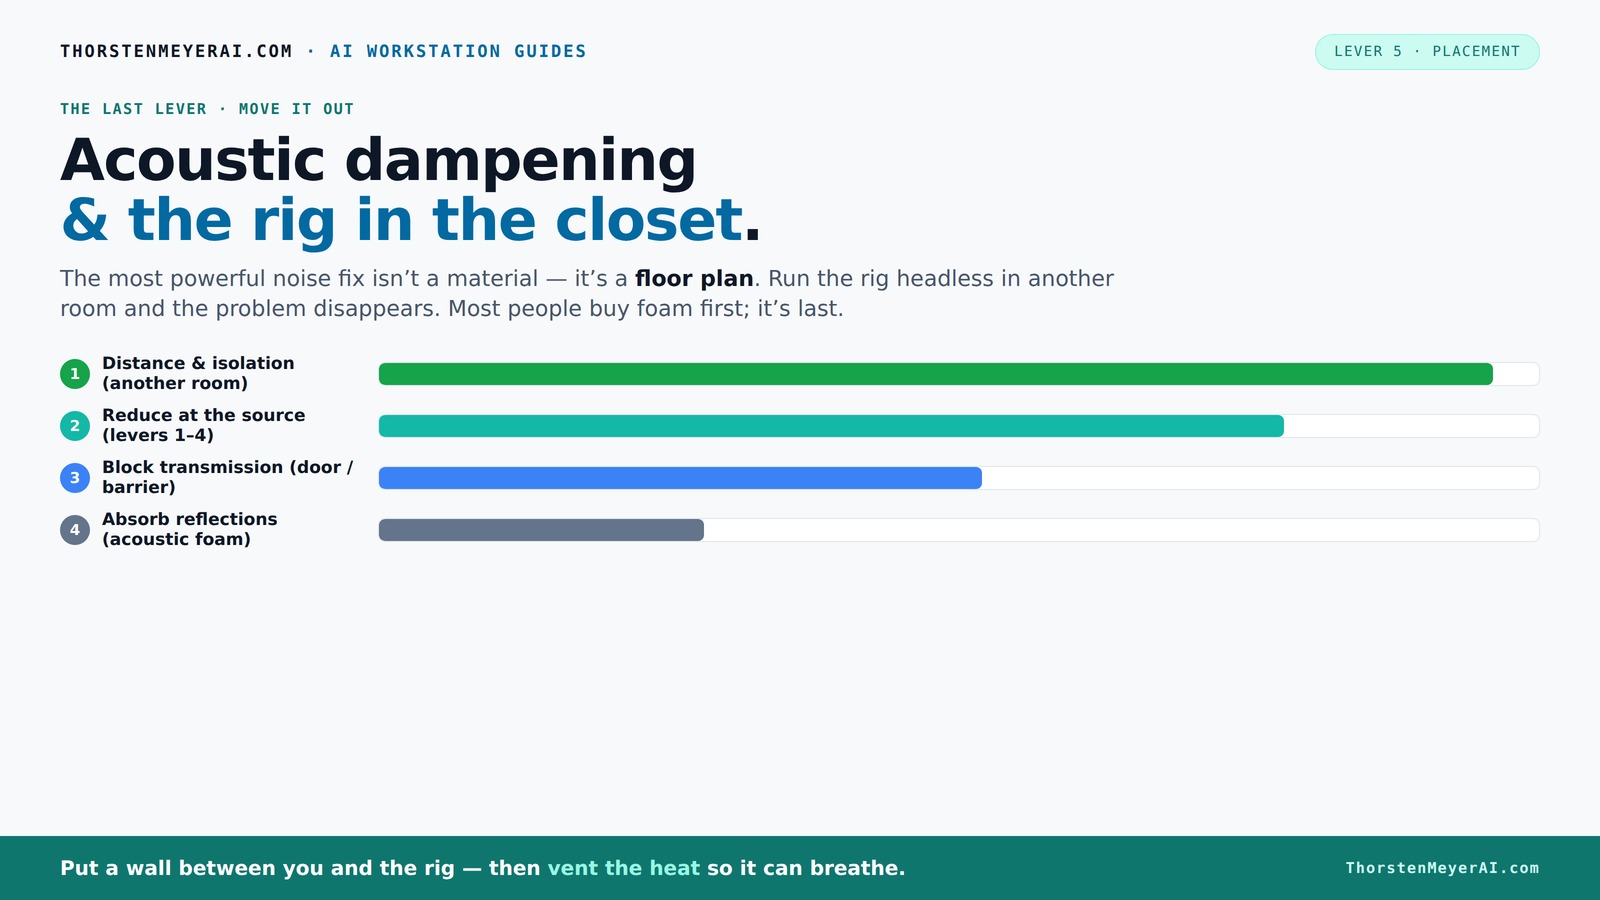
& the rig in the closet.
The most powerful noise fix isn’t a material — it’s a floor plan. A rig you can’t hear because it’s in another room beats any amount of foam. Tap the approaches in Part 1 to see what actually works.
(another room)
(levers 1–4)
(door / barrier)
(acoustic foam)
Contain the noise, not the heat
Key Takeaways
- Prioritize distance and sealing gaps over filling the closet with foam. Moving your rig away from your ears makes the biggest difference.
- Treat reflection points—behind the mic, side walls, and ceiling—to drastically improve vocal clarity.
- A small closet can work well with bass traps and corner treatment, but watch out for low-end buildup and standing waves.
- Sealing the door and managing heat with ventilation are critical to avoid leaks and overheating in a 'rig in the closet.'
- DIY solutions like blankets and foam are practical and budget-friendly, but know their limits and avoid over-treating.

24 Pack Black 12 x 12 x 2 Inches Pyramid Designed Acoustic Foam Panels, Sound Proof Foam Panels for Walls, High Density and Flame-Retardant Acoustic Panels, Sound Panels for Recording and Home Studio
Exceptional Sound Absorption:These pyramid acoustic panels are engineered to effectively absorb sound waves, reducing echo and reverberation. With...
As an affiliate, we earn on qualifying purchases.
As an affiliate, we earn on qualifying purchases.
Why Acoustic Dampening Isn’t the Same as Soundproofing
Acoustic damping and soundproofing are two sides of the same coin, but they serve very different purposes. Dampening reduces echo and reflections inside your space—think of it as softening the sound so it doesn’t bounce around.
Soundproofing, on the other hand, blocks sound from escaping or entering. It’s about sealing gaps and adding mass—like thick walls or soundproof doors. For a closet, dampening makes your voice sound better, while soundproofing keeps noise from leaking out.
For example, hanging foam panels behind your mic cuts down on bounce-back, but sealing the door with blankets stops your neighbor from hearing your voice. Both are needed, but often people get caught up in buying foam and forget the gaps around the door.

TroyStudio Portable Vocal Booth, Large Foldable Microphone Isolation Shield, Music Recording Studio Sound Echo Absorbing Box, Desk & Stand Use Reflection Filter with Thickened Dense Acoustic Foam
【BASIC INFO】: Inside size after setup: 8'' (L) X 10'' (W) X 12'' (H), large space for various...
As an affiliate, we earn on qualifying purchases.
As an affiliate, we earn on qualifying purchases.
Where to Focus Treatment First: Reflection Points & Walls
In a closet, the best way to improve sound quality is to treat the right spots first. Place foam panels at the main reflection points—behind the mic, on the side walls, and above your head. These are the surfaces that bounce sound back into your microphone.
For example, if you’re recording vocals, put a panel directly behind the mic, and use a mirror trick to find side-wall reflection points. Covering about 20-30% of your wall space with foam or panels makes a noticeable difference without turning your closet into a padded cell.
Remember: treating the ceiling and wall behind the mic is more effective than covering every inch randomly. Prioritize these spots for quick wins in clarity.

Focusound 52 Pack Acoustic Foam Panels 1" x 12" x 12" Sound Proof Foam Panles Soundproofing Noise Cancelling Wedge Panels for Home Office Recoding Studio with 300PCS Double-Side Adhesive
Soundproofing - Acoustic foam panels triangular grooves structure for better noise absorption, helps to reduce and absorb unwanted...
As an affiliate, we earn on qualifying purchases.
As an affiliate, we earn on qualifying purchases.
The Closet Size & Its Impact on Sound Quality
Size matters. Small closets—say, 3x4 feet—are easier to control but can develop standing waves and bass buildup. Larger closets give more breathing room but might need bass traps to tame low frequencies.
For example, in a tiny closet, installing a couple of bass traps in the corners can reduce muddy low-end and prevent that 'boomy' sound. If your closet is bigger, adding 4-inch thick panels and bass traps in the corners can make a big difference.
Use the space wisely: a cramped closet might sound more controlled, but it also risks sounding boxy or muffled if you don’t treat low frequencies properly.

TOUO 12 Pack Acoustic Panels – Sound Proof Foam Panels for Wall 12"x12"x1", Flame Retardant Wedge Acoustic Foam, High-Density Sound Absorbing Panels for Home Studio(Black, 1" Thick 12 Pack)
★ 【PROFESSIONAL SOUND ABSORPTION】:Our high-density wedge acoustic foam panels provide exceptional sound absorption, effectively reducing echoes, reverb, and...
As an affiliate, we earn on qualifying purchases.
As an affiliate, we earn on qualifying purchases.
How to Seal & Treat the Closet Door Effectively
The door is often the weakest link in a closet setup. Sound leaks through gaps, hinges, and under the door. To fix this, seal gaps with weatherstripping or acoustic sealant, and add a blanket or foam over the door itself.
For example, hanging a thick moving blanket over the door frame and sealing all edges can cut sound leakage dramatically. You can also buy or DIY a door seal kit designed for soundproofing.
Be aware: a completely sealed door can cause heat buildup, so your ventilation plan must include airflow solutions like a small exhaust fan or vents.
Ventilation & Heat Management in a Closet Rig
Putting a powerful, heat-generating machine in a sealed closet might sound perfect for noise, but heat is the enemy. Without proper airflow, your equipment will throttle or overheat. Check out this guide for detailed methods on cooling your rig in a small space—because a hot rig is a noisy, slow rig.
For example, installing a quiet exhaust fan and passive vents can keep the air moving, preventing heat buildup. Use ducted airflow or a thermostat-controlled fan to maintain safe temperatures while minimizing noise.
Check out [this guide](https://thorstenmeyerai.com/reduce-heat-noise-ai-workstation/) for detailed methods on cooling your rig in a small space—because a hot rig is a noisy, slow rig.
DIY Closet Booths: Cheap, Flexible, and Effective Tricks
Many creators turn their closet into a makeshift studio using blankets, rugs, and simple framing. It’s inexpensive, flexible, and often enough for home recording. Think of it as a DIY patchwork—adding layers where needed. For more ideas, see this article.
For example, hang blankets over the walls, use foam panels at reflection points, and seal gaps with duct tape or weatherstripping. Combine with a good mic choice, and you’re set.
Remember, the goal isn’t perfection but reducing echo and leakage enough to get clean recordings without fussing over acoustic perfection.
Common Mistakes to Avoid When Creating a Closet Rig
Don’t just fill your closet with foam and call it a day. Over-treating can deaden your sound, making recordings sound too sterile or muffled. Also, neglecting low-frequency treatment leads to boomy, muddy recordings. Learn more about effective acoustic treatment at this site.
Another pitfall is ignoring ventilation—overheating equipment reduces lifespan and performance. And don’t forget the door gaps; these are the main leaks for sound to escape.
For example, a creator who sealed every crack but didn’t address heat found their rig throttling after just an hour of use. Balance is key.
What Equipment & Setup Works Best in a Closet Rig?
Choosing the right mic and gear makes a difference. Small-diaphragm condensers or dynamic mics are popular because they reject room noise better. Pair with a portable audio interface and a microphone stand with a shock mount.
For example, a Shure SM58 or Rode PodMic paired with a basic interface can give excellent results in a tight space. Use a pop filter and monitor with headphones to avoid bleed and echo.
Also, consider using a small, portable sound booth or foldable panels that you can set up around the mic for extra control.
Frequently Asked Questions
What is the difference between acoustic dampening and soundproofing?
Acoustic dampening reduces echo and reflections inside a space, making recordings clearer. Soundproofing blocks sound from leaking in or out, sealing gaps and adding mass to walls or doors. Both are important but serve different goals.
Can I turn any closet into a recording booth?
Yes, but the results depend on the size, shape, and existing gaps. Small closets are easier to control, but they can develop bass issues. Proper treatment and sealing make a big difference, and ventilation is a must.
Where should I put acoustic foam or panels in my closet studio?
Start with the wall behind the mic, then treat reflection points on the side walls, and the ceiling above. Covering about 20-30% of the surface area with foam at these key spots yields noticeable improvements.
Should I treat the walls, ceiling, or door first?
The door and reflection points are top priorities. Seal gaps around the door with weatherstripping, and treat the wall behind the mic and side reflections. Low-frequency treatment like bass traps comes last, if needed.
How do I stop sound from leaking out of my closet?
Seal all gaps around the door with weatherstripping or acoustic sealant. Hang blankets or foam over the door, and consider installing a door sweep. These steps drastically cut down on noise escape.
Conclusion
Transforming your closet into a quiet, effective recording space isn’t about covering every inch with foam. It’s about smart placement, sealing gaps, and managing heat. With a little effort, your makeshift studio can rival much pricier setups.
Remember: the real magic happens when you put space between your mic and the noise source. That simple shift makes everything else easier—and your recordings sound way better.